Error: The operation cannot complete because of an incorrect parameter in the command sent to the RAID controller module. Please re...
DELL MD STORAGE CHANGING MANAGEMENT IP ISSUE
MS SQL 2008 R2 SP1 TO SP2 UPDATE STEPS: *Download below Sql 2008 R2 sp2 update file SP2 download link; https://www.mi...
How to update MS SQL 2008 R2 SP1 to SP2
* Move sql roles to other server from failover manager.
* Installation

Click next
Click next
Accept license and click next
Click Select all and click next
update completed.
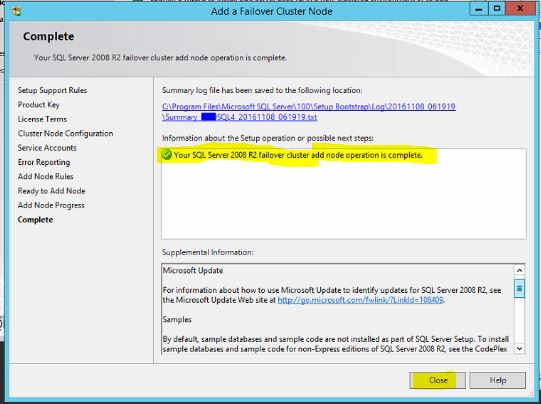
In this post i will show how to add Sql cluster node. MS Sql 2008 R2 SP1 on Windows 2012 R2 standard Step to add nodes * Instal...
How to add SQL node to failover cluster
In this post i will show how to add Sql cluster node.
* Install .net framework 3.5 feature from server manager
link for .net framework 3.5 installation
* Powershell to install Cluster automation
open powershell as administrator
use below command
add-windowsfeature RSAT-Clustering-AutomationServer
This command is required for sql server 2008 installation on 2012 R2.
Related error is command is not used
Cluster node failed
cluster service verification faileda
* Add new server to failover cluster first

* Mount Sql iso or insert dvd
Restart the server and test the failover through failover cluster manager.
Done....
Next : How to update MS SQL 2008 R2 SP1 to SP2
.Net can be install offline or online For online installation internet is required on server For offline installation Wind...
How to install .NET Framework 3.5 feature offline on Windows 2012 R2
In this post i will show how to evict Sql node safely. Use this method only if your Sql server failed and unable to recover. Steps...
How to Evict faulty sql server from failover cluster (Windows 2012R2)
In this post i will show how to evict Sql node safely.
Use this method only if your Sql server failed and unable to recover.
Steps to evict
From active Sql server node go to Server manager -- tools -- Failover cluster manager
Click on nodes. Select the DOWN node
Right click on the DOWN node -- more action -- evict
Click Evict node.
Done......
Another method to evict sql node
Remove Node
To remove a node from an existing SQL Server failover cluster
Insert the SQL Server installation media. From the root folder, double-click setup.exe. To install from a network share, navigate to the root folder on the share, and then double-click Setup.exe.
The Installation Wizard launches the SQL Server Installation Center. To remove a node to an existing failover cluster instance, click Maintenance in the left-hand pane, and then select Remove node from a SQL Server failover cluster.
The System Configuration Checker will run a discovery operation on your computer. To continue, Click OK..
After you click install on the Setup Support Files page, the System Configuration Checker verifies the system state of your computer before Setup continues. After the check is complete, click Next to continue.
On the Cluster Node Configuration page, use the drop-down box to specify the name of the SQL Server failover cluster instance to be modified during this Setup operation. The node to be removed is listed in the Name of this node field.
The Ready to Remove Node page displays a tree view of options that were specified during Setup. To continue, click Remove.
During the remove operation, the Remove Node Progress page provides status.
The Complete page provides a link to the summary log file for the remove node operation and other important notes. To complete the SQL Server remove node, click Close.
Done....
Next post: How to add SQL node to failover cluster
Link for Dell Compellent initial configuration ISCSI CONFIGURATION STEPS: * Rename iscsi network card and assign iscsi ip ...
How to configure iscsi on windows server 2012 R2 for Compellent storage
 |
| Highlighted adapters are used for iscsi network |
 |
| To unbind right click on iscsi adapter and click properties then remove ipv6, Client for microsoft network & File and printer sharing from all iscsi adapter |
- Right click on iscsi adapter
- click on ipv4
- click properties
- click advance
- go to dns tab
- remove tick from "register this connection address in DNS" check below picture
- go to wins tab
- Disable NetBIOS over TCP/IP check below picture
 |
| DNS disable option |
 |
| NetBIOS disable option |
 |
| Go to server manager click tools - iscsi initiator |
 |
| Click discovery tab then click discover portal |
 |
| Assign Compellent iscsi ip configured in initial config. |
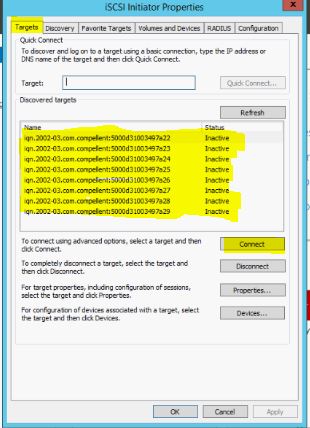 |
| Go to Target tab, click on inactive name and connect with multipath and all iscsi adapters |
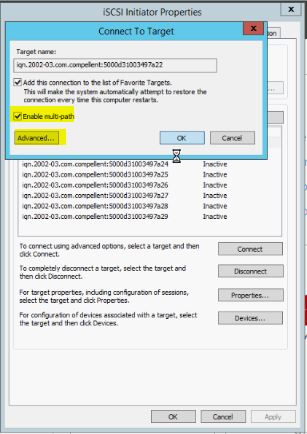 |
| Enable multipath click advance |
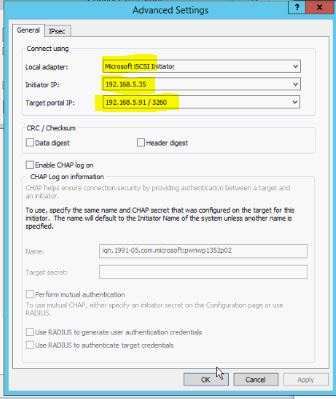 |
| Connect available path and click ok twice |
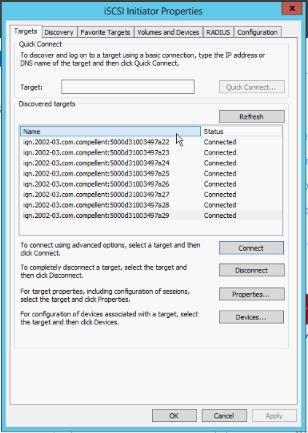 |
| once all path connected click ok |




Follow Us
Were this world an endless plain, and by sailing eastward we could for ever reach new distances